
Digital
Setting up a cost effective user research lab
December 10, 2014 by Jono Ellis No Comments | Category Digital Public Services, mygov.scot
Our user research / usability lab is very simple and cheap solution for everyday activities – coming in well under normal costs. It is relatively portable, procurement and health and safety supervision free and can be setup within minutes. We tested a number of more advanced setups based on Apple TV and/or Wi-Fi solutions but all of them sooner or later failed as a reliable solution in our environment.
For the environment, we need to work under the supervision of the facilities team to make sure everything meets health and safety rules. That includes underfloor cables, painting, moving quiet pods, colours and reflectiveness of the desk, and the location of lighting. There is a cost associated with these services.
Our dev network needs to meet required security levels which can result in limitations. Once we started to use the dev environment to browse alpha, Apple TV got mixed up over Wi-Fi and failed to find IPs of server.
We decided to go with a simple wired solution
Our setup includes
a) 2 rooms within a reasonable proximity
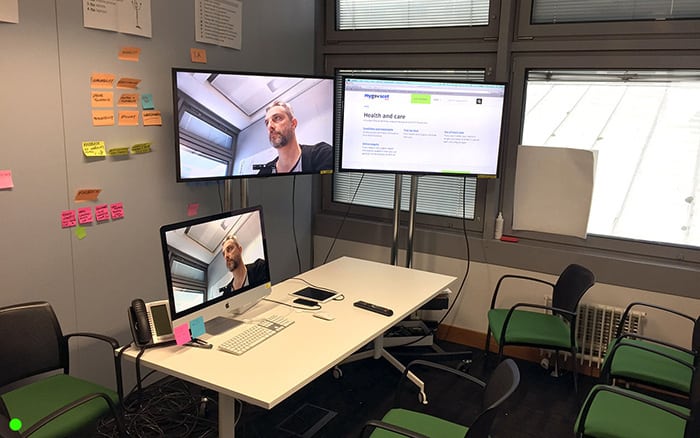
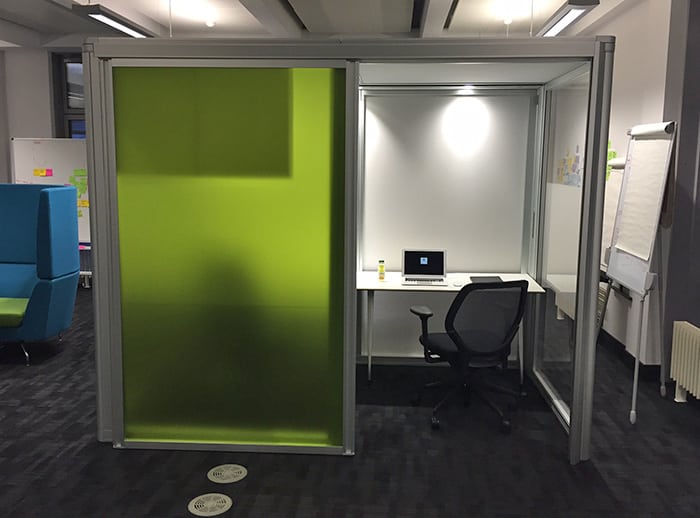
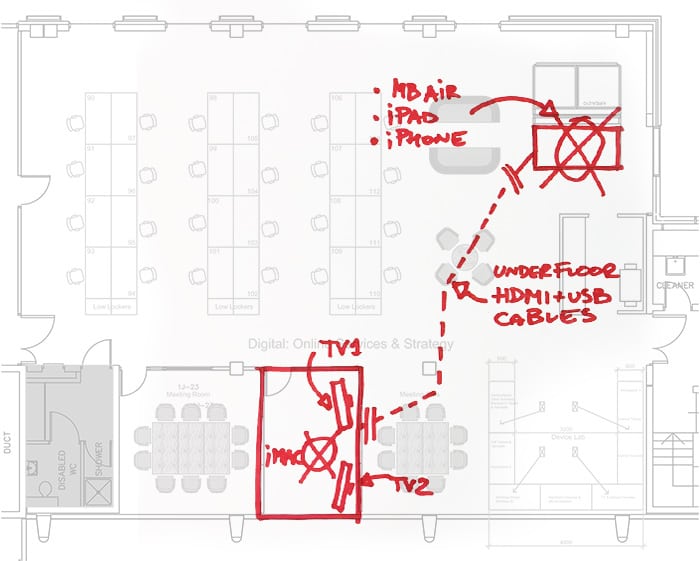
One of them is a usability testing room and the other is a (bigger) observation room. It is important that participants are not aware of the presence of the observers. It would be ideal to have 2 rooms divided by a sound proof wall or have one room above another on different floors. We could not make an arrangement with facilities regarding any of the above solutions. As a result we used a quiet pod and one of our meeting rooms, approximately 15 metres apart.
b) 2 computers, iPad, iPhone
We use 13″ Macbook Air and iMac (the basic version will do the job), iPad and iPhone / iPod
c) We have two 32″ TV – any with HDMI sockets will be fine.
d) 2 x HDMI and USB cables, 2 x HDMI to thunderbolt adaptors, HDMI to lightning adaptor
Our cables are 20 metres long. We aimed for a mid to high price range as the length is above the recommended average, especially for the USB cable. It’s safe to buy any HDMI to thunderbolt adaptors however the recommendation is to select the original Apple HDMI to lightning adaptor.
e) webcam (*optional – another webcam might be required look at Silverback problems)
As main source, we went with Logitech C920 HD Webcam (USB) as it delivers great video and descent sound. If you have fluorescent lighting you might consider using Webcam Settings app to change the frequency of webcam to eliminate flickering. https://itunes.apple.com/gb/app/webcam-settings/id533696630?mt=12
f) Silverback 2.0 app, UX recorder and quicktime app
We use Silverback 2.0 app to record sessions. It was paid software however good news is it is now available as freeware. The Silverback app is incompatible with 2013 onward Macbooks. It can not use the in-built camera and results in the failure to record sound. A quick fix is to plug in the cheapest camera you can find and select an in-built microphone in audio settings (hold Alt Key and click speaker next to clock).
The UX recorder app for iPad and iPhone uses in-built browser and can record the screen. The only disadvantage we found is that if the power button is pressed during a recording session, the app quits and the whole video is lost.
Quicktime / Menu -> New Movie Recording -> Select Logitech camera for video and sound by clicking arrow on right side – we use it to stream the video and sound from USB Logitech camera.
What our setup does…
We pulled the HDMI and USB cable under the floor from the Pod to the observer room. The MacBook Air / iPad / iPhone streams desktop video via HDMI to TV1 in the observers room. Logitech Webcam streams via USB and Quicktime video and sound to iMac and from iMac to TV2 via short HDMI cable. In the meantime, the software on the device records the desktop, from camera view and sound. The MacBook is connected via Wi-Fi to our dev network, however we have the backup LAN wire in the pod.
Issues
Only one – probably due to the length of the USB cable (5 max recommended, ours has 20) sound noise builds up and we need to switch it off and on again to reset it.
Things to consider
- Any additional costs like furniture (table, chairs, etc)
- Limitations of WI-FI / LAN access to your dev
- Lighting – traditional bulbs or LEDS working on DC power will be the best
- Back up your video files
- Air conditioning
- Refreshments
Participants
Picking the right participants is vital. Plucking people out that are likely to use the service, or support people in using the service, can help you drastically improve the product. In many instances people are willing to come along with costs covered.
Otherwise, you need to consider the cost of recruitment if you choose to use agencies and any incentive per participant (which can be up to £80). Procurement might be required which involves additional costs. You also have to factor in an incentive handling fee in the agency costs, which can save you the hassle of organising and handing over cash.
Freebies
- Project_Consent_Form.docx – stay covered, make sure you ask participants to sign the consent form before you begin
- Book-your-place.JPG – encourage other team members to attend the sessions
Other sources
If you would prefer or need a higher specification and have higher budget read here about GDS user research lab. Just keep in mind this is an impressive dream setup and you will most likely need to procure it.
This is a post by Greg Kozakiewicz, our Head of UX, Design and Research.
Tags: Design and User Experience, user research
Leave a comment